Navigation
A First Look at the Wicket Framework
Introduction
When Kevin Taylor asked readers of his blog what web framework they were using, the majority of them replied that they were using Wicket. There was some speculation that these results were the effect of guerrilla marketing, nevertheless I was curious. I downloaded the latest beta version of Wicket and took it for a spin.
Wicket's claim to fame is that it uses standard HTML pages as its front end, therefore HTML designers have complete freedom on how to design the pages, they are free to use Dreamweaver, FrontPage, NVU, or any other WYSIWYG tool to create the markup. Another feature is that development of Wicket web applications require no XML configuration files like those found on other frameworks like Struts or JSF.
I had no previous experience with Wicket before writing this article, therefore the article is written from the point of view of a wicket novice. I hope that it serves as both a review and as a tutorial.
Writing a Web application with Wicket
Having no previous experience with wicket, I looked for online tutorials or introductions, I was not able to find much.
The wicket web site has some examples that can be downloaded, and there is JavaDoc, but this is not enough to learn about how the framework works. I was able to figure out what I needed to do, but it took me much longer than it would have if I had found good documentation.
The first thing I wanted to do, just to get my feet wet, was to display
a simple HTML page with no dynamic fields through Wicket. When deploying
wicket applications, the application is declared in a standard
web.xml
file, using
wicket.protocol.http.WicketServlet
as the servlet, and passing instance of a class extending
wicket.protocol.http.WebApplication
as its only initialization parameter. As an example, here are the
relevant sections of the web.xml used for the sample application:
        <servlet>


    <servlet-name>WicketTestApplication</servlet-name>

            <servlet-class>


    wicket.protocol.http.WicketServlet

            </servlet-class>

            <init-param>


    <param-name>applicationClassName</param-name>


    <param-value>


        net.ensode.wickettest.WicketTestApplication


    </param-value>

            </init-param>


    <load-on-startup>1</load-on-startup>

        </servlet>

        <servlet-mapping>


    <servlet-name>WicketTestApplication</servlet-name>


    <url-pattern>/app/*</url-pattern>

        </servlet-mapping>
The class extending
wicket.protocol.http.WebApplication
for the sample application is trivial, all it does is call
getPages().setHomePage(WicketTestPage.class) from its constructor.
This method call will set the initial page of the application to the
HTML page corresponding to WicketTestPage.java, the source code for the
sample application can be downloaded as a zip file, there is a link
under the Resources section at the end of the article.
Once the application is deployed, it is accessed the same way any standard war file is deployed, assuming your war file is called wicketapp.war, and using the url pattern shown in the web.xml above, the application would be accessed using the URL: https://localhost:8080/wickettestapp/app. This URL assumes you are deploying to your local workstation and that the servlet container is listening to port 8080, substitute the host name and port as appropriate.
Since Wicket works with standard HTML, I created the simple page
based on the same template I use for all the pages on this web site,
and, following one of the examples distributed with wicket, created a
simple class extending wicket.markup.html.WebPage and
adding no components to it, gave both files the same name (sans
extension), created a war, deployed to Tomcat and tested. The page
did work, sort of, the HTML page was not finding the css stylesheet,
which I had deployed to the same directory where the HTML file resided.
It took me a while to figure out how to make the file see the css,
after looking at one of the examples distributed with Wicket, I realized
that the css file needed to be deployed to the root directory of the war
file, as opposed to deploying it to the same directory where the HTML
file is deployed, which must be the same directory where the
corresponding class extending WebPage resides. Once I got past
that hurdle, the next thing I wanted to do was to create a page with a
form, have the user enter some values into the form and submit it, then
have a confirmation page displaying the information just entered.
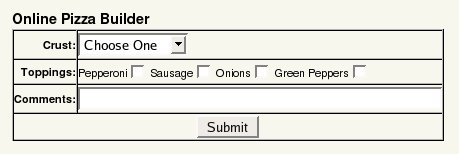
I opted to create a fictitious online pizza ordering application,
having the user select the pizza crust via a drop down, toppings via
checkboxes, and adding a comments text field.

Since I could find next to no Wicket documentation online, It was not clear to me how the framework works, I will give a brief explanation here to save future wicket framework users some time, Wicket has the concept of model objects, these objects are simple POJOs (Plain Old Java Objects) that hold the values of the components on a page. These model objects are a similar concept to Backing Beans in JSF or Form Beans in Struts. The HTML pages containing Wicket components have some special HTML attributes that are used for mapping them to the Model objects, the attribute names must match fields of the Model objects, when a user enters some data in the HTML form and submit the page, the appropriate properties on the Model object are populated with the data entered by the user.
When writing applications with wicket, each HTML page must have a corresponding Java object extending the WebPage class. The HTML file and the Java class must have the same name, for example, an HTML file called MyWicketPage.html must have a corresponding MyWicketPage.java. The HTML files must be deployed to the same directory where the corresponding java classes reside. Wicket has several components meant to be mapped to HTML form fields. Components can be added to each other in a matter similar to the DOM of the HTML page. If the page has a form with a drop down, some checkboxes and a text field, instances of the DropDownChoice, CheckBox and TextField classes must be added to an instance of the Form class. The Form then needs to be added to the java class corresponding to the HTML page. For the test application, the relevant html looks like this:
<form
wicket:id="pizzaForm">
<div style="font-weight: bold;" font-weight=""
bold=""><big>Online Pizza Builder</big></div>
<table style="text-align: left; width: 427px; height: 112px;"
border="1"
cellpadding="0" cellspacing="0">
<tbody>
<tr>
<td
style="font-weight: bold; text-align: right;">Crust:</td>
<td><select wicket:id="crust">
<option>option 1</option>
<option>option 2</option>
<option>option 3</option>
</select></td>
</tr>
<tr>
<td
style="font-weight: bold; text-align: right;">Toppings:</td>
<td>Pepperoni<input wicket:id="pepperoni" type="checkbox" />
Sausage<input
wicket:id="sausage" type="checkbox"
/> Onions<input
wicket:id="onions" type="checkbox"
/> Green Peppers<input
wicket:id="greenPeppers" type="checkbox"
/></td>
</tr>
<tr>
<td
style="font-weight: bold; text-align: right;">Comments:</td>
<td><input maxlength="50" size="50" wicket:id="comments"
type="text" /></td>
</tr>
<tr>
<td
style="text-align: center;" colspan="2"><input value="Submit"
name="Submit" type="submit" /></td>
</tr>
</tbody>
</table>
</form> 


